Zugriff per OpenVPN auf die CCU – Teil 1
Ein Remote-Access zur Hausautomatisierung kann sehr praktisch sein. CloudMatic bietet hier eine Lösung, ist allerdings kostenpflichtig. Wenn man jedoch bereits einen Server betreibt, bietet es sich an, diesen auch als VPN-Server zu benutzen. Das hat ausserdem den Vorteil, dass man auch auf andere Ressourcen im Remote-Network zugreifen kann, z.B. auf den Router oder die Webcam. Nachfolgend wird das Setup für Ubuntu 18.04 beschrieben.
Netzwerk-Setup
Die Idee ist, dass sich sowohl die CCU3, als auch mein Handy oder Laptop auf den OpenVPN-Server einwählen. Da sich die CCU nicht ohne grössere Verrenkungen direkt mit dem Server verbinden kann, muss dass ein Router übernehmen. Bei mir ist das ein Asus RT-N66U mit Tomato Firmware. Selbstverständlich ist sowohl der Client lnx001, als auch der Tomato-Router über jeweils einen weiteren Router mit dem Internet verbunden.
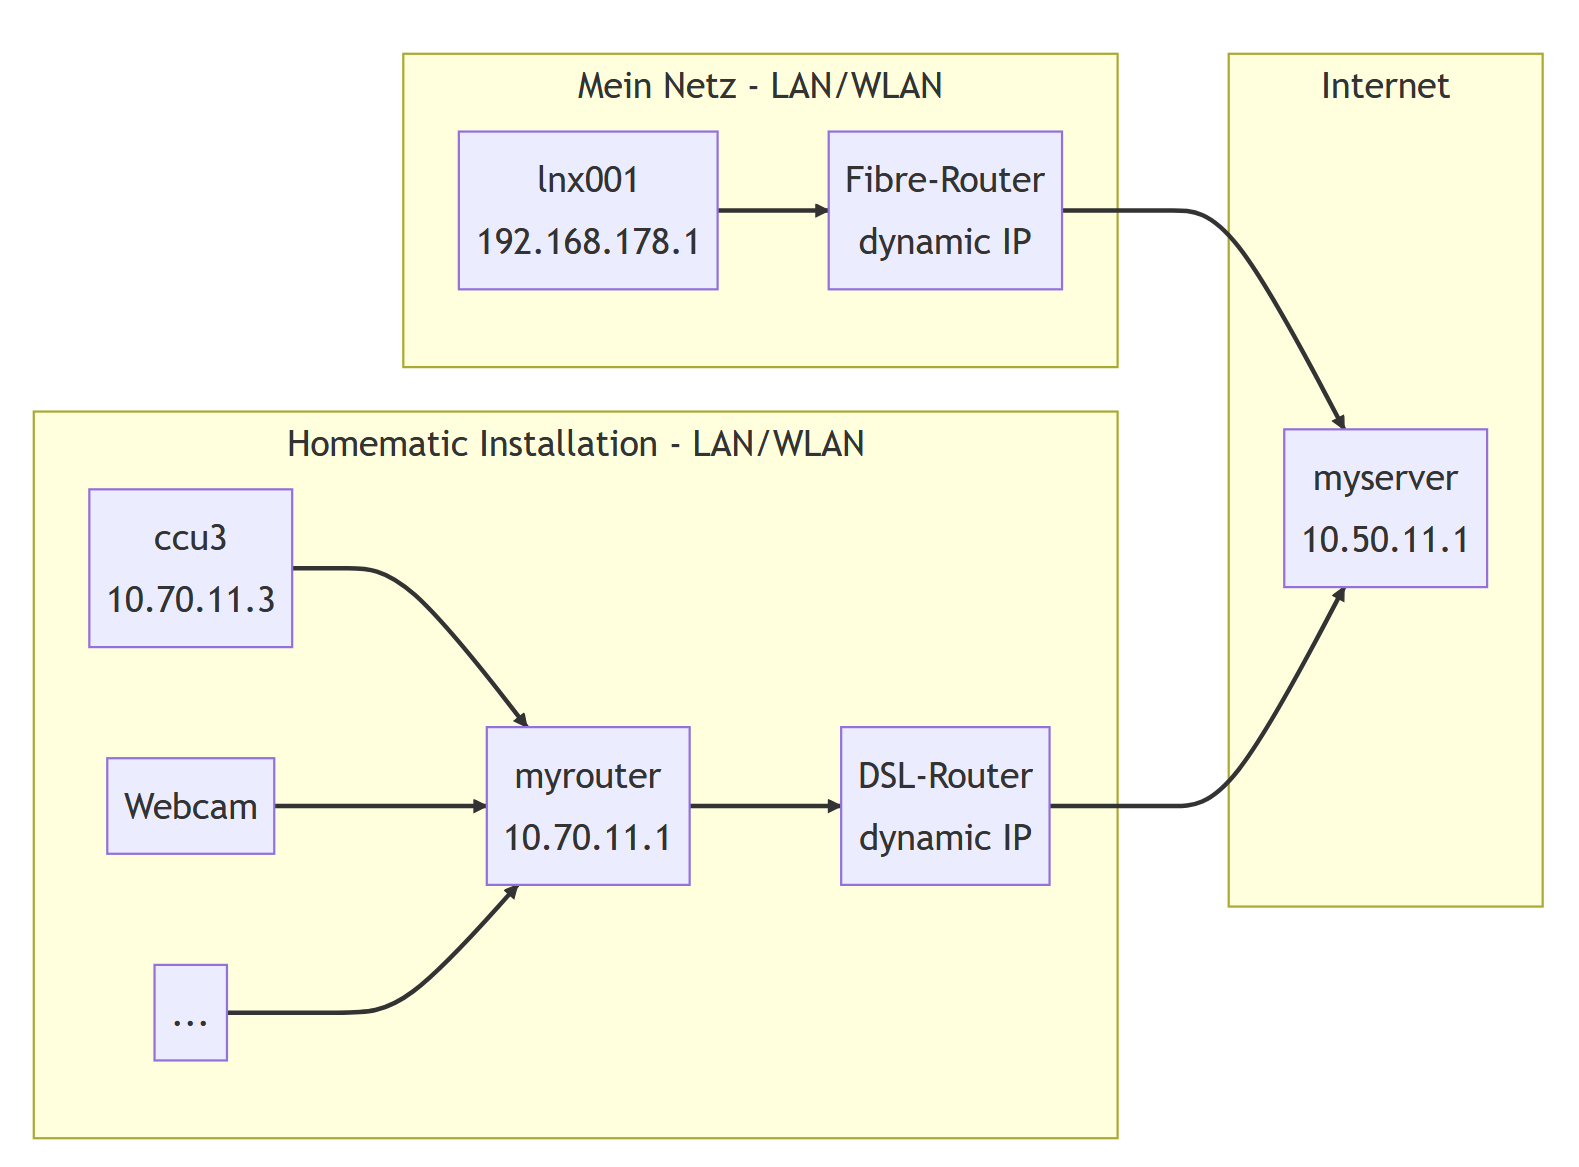
Abbildung: Netzwerk-Schema
Wichtig sich zu merken ist, dass 2 Netzwerke aufgespannt werden: 10.50.11.0/24 und 10.70.11.0/24. Im letzteren ist die CCU3 und eventuell noch andere Geräte, wie etwa eine Webcam. All diese Geräte sollen direkt über OpenVPN vom Client lnx001 und anderen erreichbar sein.
OpenVPN server keys
Zuerst werden die notwendigen Pakete installiert (als root):
root@myserver:~$ apt-get install openvpn easy-rsa
root@myserver:~$ make-cadir ~/openvpn-ca
Als nächstes muss die Certification Authority angelegt werden. Dafür sollten als erstes die Einstellungen in ~/openvpn-ca/vars angepasst werden, vor allem KEY_COUNTRY, KEY_PROVINCE, KEY_CITY, KEY_ORG, KEY_EMAIL und KEY_OU. Anschliessend:
root@myserver:~# cd ~/openvpn-ca
root@myserver:~/openvpn-ca# source ./vars
root@myserver:~/openvpn-ca# ./clean-all
root@myserver:~/openvpn-ca# cp openssl-1.0.0.cnf openssl.cnf
root@myserver:~/openvpn-ca# ./build-ca
root@myserver:~/openvpn-ca# ./build-key-server myserver
Eine Fehlermeldung bezüglich des fehlenden .rnd-file kann ignoriert werden. Die Zertifikate werden trotzdem erstellt. Am Schluss sollte die Frage nach der Signatur und dem Commit mit “y” beantwortet werden:
Certificate is to be certified until Sep 28 10:32:26 2029 GMT (3650 days)
Sign the certificate? [y/n]:y


1 out of 1 certificate requests certified, commit? [y/n]y
Write out database with 1 new entries
Data Base Updated
root@myserver:~/openvpn-ca#
Wenn das erfolgreich abgeschlossen ist, noch die Diffie-Hellmann keys und die HMAC-Protection erzeugen:
root@myserver:~/openvpn-ca# ./build-dh
root@myserver:~/openvpn-ca# openvpn --genkey --secret keys/ta.key
Letzters wäre eigentlich nicht nötig, erhöht aber die Sicherheit (siehe Hardening OpenVPN Security) und sollte daher immer verwendet werden.
OpenVPN client keys
Nun müssen noch die Zertifikate und Keys für einen Client erzeugt werden. Ich verwende als Client-Name immer den Hostname.
root@myserver:~/openvpn-ca# ./build-key lnx001
root@myserver:~/openvpn-ca# ./build-key myrouter
Nach dem interaktiven Bestätigen oder Modifizieren der Angaben sollte nicht vergessen werden, das Zertifikat zu signieren und zu commiten. Pro Gerät und Benutzer (Handy, Laptop, Tablet etc.) sollte ein Key erzeugt werden. Das macht ersten parallele Verbindungen zum Server möglich und zweitens können einzelne Keys so gesperrt werden (z.B. beim Verlust des Geräts), ohne dass man auf allen Rechnern die Keys neue installieren muss.
Die Server-Keys müssen nun in die OpenVPN-Konfiguration unter /etc kopiert werden:
root@myserver:~/openvpn-ca# cp -r keys /etc/openvpn
Server konfigurieren
Jetzt muss noch die /etc/openvpn/server.conf angelegt werden. Ich habe alles herausgelöscht, was für unser Beispiel nicht zwingend notwendig ist. Es sei jedoch darauf hingewiesen, dass es wesentlich mehr Optionen gibt, als nachfolgend aufgeführt.
# Which TCP/UDP port should OpenVPN listen on?
# If you want to run multiple OpenVPN instances
# on the same machine, use a different port
# number for each one.  You will need to
# open up this port on your firewall.
port 1194

# TCP or UDP server?
; proto tcp
proto udp

# "dev tun" will create a routed IP tunnel,
# "dev tap" will create an ethernet tunnel.
# Use "dev tap0" if you are ethernet bridging
# and have precreated a tap0 virtual interface
# and bridged it with your ethernet interface.
# If you want to control access policies
# over the VPN, you must create firewall
# rules for the the TUN/TAP interface.
# On non-Windows systems, you can give
# an explicit unit number, such as tun0.
# On Windows, use "dev-node" for this.
# On most systems, the VPN will not function
# unless you partially or fully disable
# the firewall for the TUN/TAP interface.
;dev tap
dev tun

topology subnet

# SSL/TLS root certificate (ca), certificate
# (cert), and private key (key).  Each client
# and the server must have their own cert and
# key file.  The server and all clients will
# use the same ca file.
#
# See the "easy-rsa" directory for a series
# of scripts for generating RSA certificates
# and private keys.  Remember to use
# a unique Common Name for the server
# and each of the client certificates.
#
# Any X509 key management system can be used.
# OpenVPN can also use a PKCS #12 formatted key file
# (see "pkcs12" directive in man page).
ca /etc/openvpn/keys/ca.crt
cert /etc/openvpn/keys/myserver.crt
key /etc/openvpn/keys/myserver.key  # This file should be kept secret

# Diffie hellman parameters.
# Generate your own with:
#   openssl dhparam -out dh1024.pem 1024
# Substitute 2048 for 1024 if you are using
# 2048 bit keys.
dh /etc/openvpn/keys/dh2048.pem

# Configure server mode and supply a VPN subnet
# for OpenVPN to draw client addresses from.
# The server will take 10.50.11.1 for itself,
# the rest will be made available to clients.
# Each client will be able to reach the server
# on 10.50.11.1. Comment this line out if you are
# ethernet bridging. See the man page for more info.
server 10.50.11.0 255.255.255.0

# Push routes to the client to allow it
# to reach other private subnets behind
# the server.  Remember that these
# private subnets will also need
# to know to route the OpenVPN client
# address pool (10.8.0.0/255.255.255.0)
# back to the OpenVPN server.
push "dhcp-option DNS <YOUR DNS IP ON THE OPENVPN SERVER>"
push "dhcp-option DNS <YOUR 2nd DNS IP ON THE OPENVPN SERVER>"
push "explicit-exit-notify 3"

# To assign specific IP addresses to specific
# clients or if a connecting client has a private
# subnet behind it that should also have VPN access,
# use the subdirectory "ccd" for client-specific
# configuration files (see man page for more info).

client-config-dir /etc/openvpn/ccd
route 10.70.11.0 255.255.255.0 10.50.11.11

# If enabled, this directive will configure
# all clients to redirect their default
# network gateway through the VPN, causing
# all IP traffic such as web browsing and
# and DNS lookups to go through the VPN
# (The OpenVPN server machine may need to NAT
# or bridge the TUN/TAP interface to the internet
# in order for this to work properly).
push "redirect-gateway def1"

# Uncomment this directive to allow different
# clients to be able to "see" each other.
# By default, clients will only see the server.
# To force clients to only see the server, you
# will also need to appropriately firewall the
# server's TUN/TAP interface.
client-to-client

# The keepalive directive causes ping-like
# messages to be sent back and forth over
# the link so that each side knows when
# the other side has gone down.
# Ping every 10 seconds, assume that remote
# peer is down if no ping received during
# a 120 second time period.
keepalive 10 120

# For extra security beyond that provided
# by SSL/TLS, create an "HMAC firewall"
# to help block DoS attacks and UDP port flooding.
#
# Generate with:
#   openvpn --genkey --secret ta.key
#
# The server and each client must have
# a copy of this key.
# The second parameter should be '0'
# on the server and '1' on the clients.
tls-auth /etc/openvpn/keys/ta.key 0 # This file is secret

# Select a cryptographic cipher.
# This config item must be copied to
# the client config file as well.
;cipher BF-CBC        # Blowfish (default)
; cipher AES-128-CBC   # AES
cipher AES-192-CBC   # AES
;cipher DES-EDE3-CBC  # Triple-DES

# Enable compression on the VPN link.
# If you enable it here, you must also
# enable it in the client config file.
comp-lzo adaptive

# It's a good idea to reduce the OpenVPN
# daemon's privileges after initialization.
#
# You can uncomment this out on
# non-Windows systems.
user nobody
group nogroup

# Output a short status file showing
# current connections, truncated
# and rewritten every minute.
status openvpn-status.log

# By default, log messages will go to the syslog (or
# on Windows, if running as a service, they will go to
# the "\Program Files\OpenVPN\log" directory).
# Use log or log-append to override this default.
# "log" will truncate the log file on OpenVPN startup,
# while "log-append" will append to it.  Use one
# or the other (but not both).
log         openvpn.log
;log-append  openvpn.log

# Set the appropriate level of log
# file verbosity.
#
# 0 is silent, except for fatal errors
# 4 is reasonable for general usage
# 5 and 6 can help to debug connection problems
# 9 is extremely verbose
verb 4
Das Routing zwischen den Netzen muss noch konfiguriert werden. Dafür legen wir ein Verzeichnis ccd an und erstellen Konfigurationen für den Asus-Router. Es ist wichtig, dass der Dateiname exakt der Name des Key (hier: myrouter.key) ohne Endung ist. Nachfolgend wird der Router so konfiguriert, dass er im OpenVPN-Netz immer die IP 10.50.11.11 erhält und er als Router für das Netz 10.70.11.0 agiert.
root@myserver:/etc/openvpn# mkdir ccd
root@myserver:/etc/openvpn# vi ccd/myrouter
ifconfig-push 10.50.11.11 255.255.255.0
iroute 10.70.11.0 255.255.255.0
Jetzt ist die Einrichtung des Server fast abgeschlossen und es kann ein erster Test durchgeführt werden.
Erster Test
Falls eine Firewall o.ä. installiert ist, ist jetzt ein guter Zeitpunkt den UDP-Port 1194 zu öffnen.
Dann sollten die erzeugten Zertifikate und Keys (für lnx001: lnx001.crt, lnx001.csr und lnx001.key, für myrouter entsprechend) auf das jeweilige Gerät und ta.key und ca.crt auf alle Geräte transferiert werden.
Unter Ubuntu kann man OpenVPN über das UI des NetworkManagers konfigurieren. Eventuell ist vorher die Installation des Plugins notwendig:
apt-get install network-manager-openvpn-gnome
Dann können mit Klick auf das Netzwerksymbol in der oberen Leiste die Netzwerkverbindungen editiert werden. Für eine neue Verbindung auf “Add” klicken:
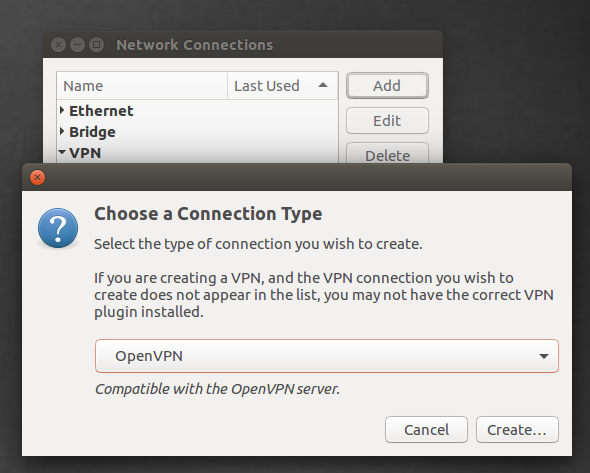
Abbildung: Neue OpenVPN-Verbindung
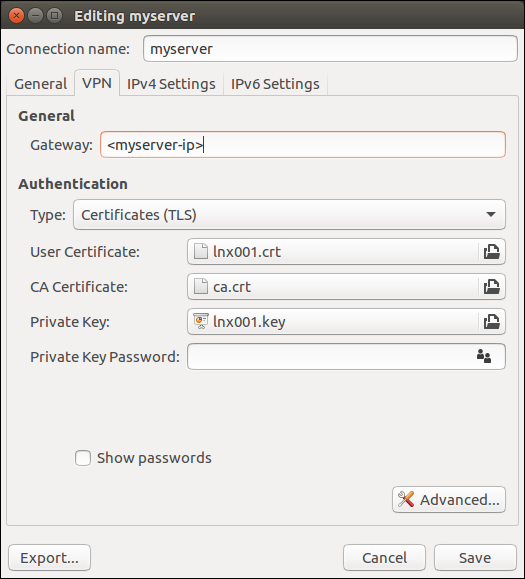
Abbildung: Zertifikate und Server-IP
Nun auf “Advanced” klicken. Es öffnet sich folgender Dialog:
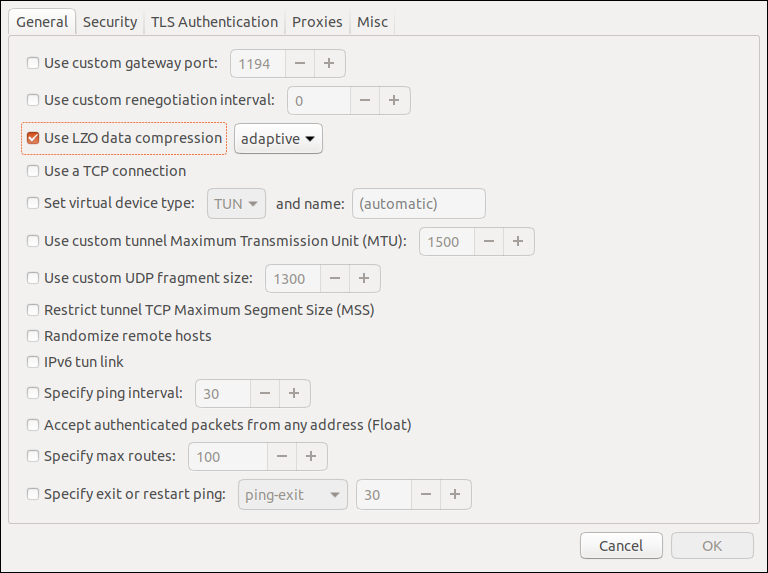
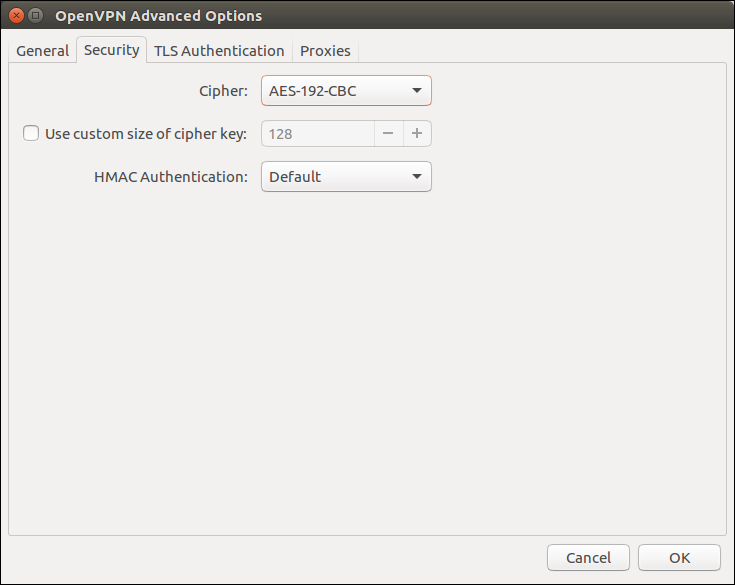
Abbildung: Cipher wählen
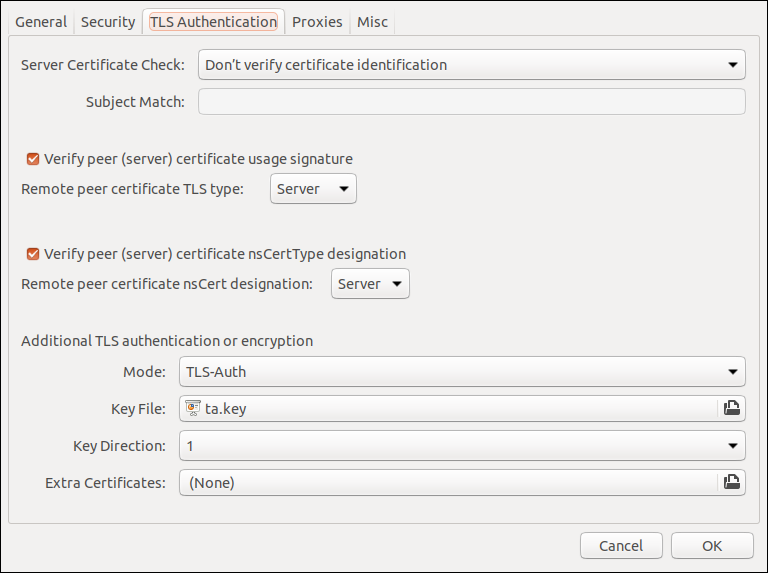
Abbildung: TLS Authentication konfigurieren
Nach dieser Konfiguration kann die Client-Verbindung zum OpenVPN-Server aufgebaut werden. Auf dem Client sollte es keine Fehlermeldungen geben und auf dem Server sollte man in der Datei /etc/openvpn/openvpn-status.log seine Verbindung sehen. Bei Erfolg hat man erstmal nur Zugriff auf den Server und noch nicht auf die CCU, da die Verbindung zum Router und das Routing der Netzwerk-Pakete noch nicht steht. Auch die Verbindung in den Rest des Internets funktioniert noch nicht, man kann also nicht surfen.
Wie das geht, erkläre ich im 2. Teil.